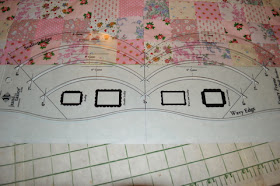
That's where Helen comes in....and yes I do realize that those aren't scallops on the border. I'll make another baby quilt to test that out on later.
For the top, I assembled pink 2 1/2" squares into sixteen nine-patch blocks and then arranged those into four rows of four. Then I bordered the whole thing with 5" wide strips of solid green fabric.
I don't have the nerve to mark directly on the quilt top -- not when I'm experimenting in the first place, so I ironed freezer paper over the borders, careful to keep the straight edge lined up with the pieced center of the quilt.
Following the directions from the June Tailor website, I marked the center of the quilt, then lined up the "0" line on the ruler with the center of the quilt. They measure in from the outside of the border -- I lined up the notch for the second scallop with the pieced center of my quilt, and traced along the wave edge of the ruler. When you get to the end of the ruler, line up the straight edge with the center line and continue the waves.
I'd intended to do the scalloped corners, but I liked the way that the wave edges looked when they crossed at the corners, so I used that instead. (Did I mention that I'll be making more baby quilts with this ruler?)
Once the lines are drawn around all four sides, cut the top out and gently peel back the freezer paper.
Now comes the fun part! I made this quilt without separate binding. Layer batting, backing with the right side up, and the top with the right side down. I used cotton batting for this one because I think it's less slippery.
Pin the three layers together. I kept my pins close to the inner edge of the border to keep them from distorting the edge. Sew all three layers together 1/4" inside the cut edge, leaving an opening just large enough to turn the quilt right side out.
Tug and wiggle so that the corners are the right shape and the waves lie flat, then top stitch 1/4" in from the edge to keep them there. I also used the top stitching to seal the opening.
Now I'm going to suggest something that goes against every quilting rule I've heard -- after pin basting the layers together to keep them from shifting around while I did the free-motion quilting, I started with the borders and quilted my way in to the center. If I had to ease in any fullness, I wanted it in the printed squares, not along that solid border where it would stick out like a sore thumb. It worked for me.
My quilt finished at about 32" square.
As always, if you make this quilt I'd love for you to send me a picture or link up to my weekly Let's Make Baby Quilts! linky party. There's a list of my free baby quilt tutorials over in the sidebar and you can find out when new ones are added by either following my blog or liking the Let's Make Baby Quilts Facebook page.
This post is linked to I Gotta Try That, Sew Much Ado, Finish it Up Friday, Can I get a Whoop Whoop?, Get Crafting Friday, Pinworthy Projects, and Freedom Fridays. and Hooking Up With HOH, Inspired Friday.


I really like how you cut out the edge of the quilt. Very unique!
ReplyDeleteCute little quilt1 I haven't tried a scallop border yet but want to. I may have to have a look at that ruler!
ReplyDeleteVisiting from Whoop Whoop
xo jan@sewandsowfarm
ps I am a new follower.
So pretty - love the pinks and green combo. Haven't tried scalloped edges yet - yours are delightful :)
ReplyDeleteI love it! Sweet colors...
ReplyDeleteVery pretty baby quilt! Love the border. I like the freezer paper tip for the border. Thanks for sharing your photo and tips.
ReplyDeleteAdorable! I love the color of the border, my favorite color :)! Thanks for sharing!
ReplyDeleteHave a nice day!
Hugs and love from Portugal,
Ana Love Craft
www.lovecraft2012.blogspot.com
What a sweet quilt and the scalloped edge just makes it! Happy Quilting!
ReplyDeleteI love the curved edges. Nice job!
ReplyDeleteVery nice. Thank you for the how-to.
ReplyDelete